Using the Extrude Tool

The Extrude Tool takes a source plane that you provide and sweeps it through space along a path you define. The volume swept through becomes a solid object.
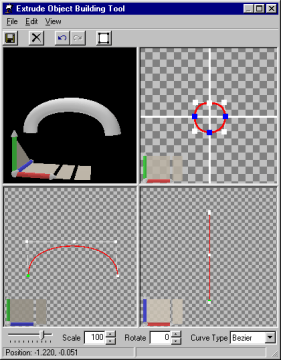
The Extrude Tool is made up of four panes. The first pane is the object preview, which displays the object created. The second pane is the source grid where you define the plane that will be swept through space. The third and fourth panes are the path grids which are used to define the path through space of the source plane. The third pane is a side view or the path and the fourth pane is a top view of the path.
The source and path are defined using control points. A series of control points are connected to create the source and path. Control points are added by clicking on the grid. The first control point is colored green. Each additional point added is colored white. The points are connected using a B-Spline curve. This form of curve has a start control point and end control point that are guaranteed to be on the curve, but any other control points act as magnets attracting the curve in their direction.
Shift-Clicking on a control point creates a new control point along the curve. Ctrl-Clicking on a control point deletes the control point.
The source plane may also have fixed control points that are guaranteed to be on the curve. Clicking a second time on a control point results in it becoming a fixed control point which is colored blue. This only applies to the source plane because fixed points within paths result in unacceptable amounts of deformation, with the resulting object folding over on itself.
In order to produce a closed object, the source must form a closed curve.
A slider is provided to adjust the detail level of the created object.
The source can be scaled as it is moved along the path by setting a Scale factor. It also can be twisted as it moves along the path by setting a Rotate factor.
As an alternative, you may choose to use N-Spline curves or Bezier curves. Bezier is a smoother curve, but N-Spline control points are guaranteed to be on the curve produced.
Click ![]() to save.
to save.
Click ![]() to reset the source and path.
to reset the source and path.
Click ![]() to undo the previous operation. Only modeling operations can be undone.
to undo the previous operation. Only modeling operations can be undone.
Click ![]() to redo the last action undone.
to redo the last action undone.
Click ![]() to display the object in wireframe mode.
to display the object in wireframe mode.
When you have completed your object simply close the Object Builder and your scene will be updated with the new object.